Understanding Web 2.0 Part 2

Blogging Websites: The most appropriate example of Web 2.0 website is a blog where users/readers can write comments on the blog, which might be useful for other readers. Users can subscribe to RSS feeds and remain updated with the blog content. RSS feeds are updated summary of the frequently updated blog content/posts. Blog websites are even one step ahead to fit into a web 2.0 website. Do you know why because readers of the blog can virtually force the author to write something of their interest therefore having a virtual control on the content of the blog website. Some of the popular blogging websites are Blogger,WordPress and TypePad.

Blogger is good for bloggers who want to create their own blog , free of cost and WordPress is good for the bloggers who do not want to compromise on the aisthetics of the blog no matter how much it costs.
One of the typical Web 2.0 application found in a blog is Label Cloud as shown below:
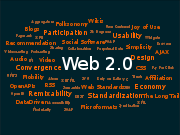
You have often seen this graphic in a blog and is popularly known as label cloud. All the topics/categories of a blog content are integrated in a single graphic which lets the users to click on the topic they are looking for, adding to the aesthetics of the blog.

Social-Networking sites: Some of the popular social networking sites are Orkut, Facebook, and Hi5. These web sites give you the opportunity to make friends, share information like photo, video and take part in online discussions on the web. I don’t know how real are the identities of these people who appear on these sites in fact you never know who are these people. One thing that I like about these sites is to offer quick solutions to those people who want be someone else who they wish to, can do it here on these sites by just clicking some links. Creating a fake identity on web is like made to order child which is impossible in real life So I think that social networking sites can be called the best examples of Web 2.0 as they motivate/encourage the users to adding content, making changes to the aesthetics of their profiles on site and using content in a different format anywhere on the web.
Some of the popular social networking sites are:
Orkut,Facebook, MySpace, Bebo,Friendster, hi5,PerfSpot, Yahoo 360,Zorpia, Netlon.

Personally I do not like any one of them because none of them can be called a social networking site unless they guarantee the identity of the people appearing on these sites. These sites encourage users to create their virtual network and therefore I call them as virtual networking sites unless these virtual networks get a life.

Video sharing sites: YouTube is the most popular video-sharing site these days. Users can upload their videos and will be available for other users to see them. In a way users are contributing value to the content of the website and therefore can be called a Web 2.0 website. Some More examples of Video sharing sites are as:
YouTube: YouTube is a popular free video sharing Web site, which lets users upload, view, and share video clips. It is so popular that many people think that You Tube is the only video-sharing site on the web.
Meta Cafe: Metacafe - Get the best Internet videos - Funny videos, Amazing clips, Rare movies.
Vimeo: Share your video clips. Upload video that you shoot with your digital camera, mobile phone, or camcorder. Share video by linking to Vimeo.
Some other popular video sharing sites are:
DailyMotion,Imeem,ClipShack,vSocial,Jumpcut,VideoBomb,eyeSpot,revver Avidbeauty

Photo sharing sites: This web site allows users to upload and share photos. Some of the Popular Photo sharing web 2.0 Websites are as:

Flickr: The best way to store, search, sort and share your photos
Zooomr: Universally the best way to share, search, store and sort your photos online.
HQ:Are your photos stuck on your hard drive, instead of being shared with the people who matter to you?
Mybloop: MyBloop - sharing pictures, audio, and video for free, whithout storage limits and additional software to install

Wikis (like wikipedia): These websites allows users to add content and even to edit already added content/articles.
Wikipedia: The biggest multilingual free-content encyclopedia on the Internet. Over two million articles and still growing.
LittleWiki: LittleWiki is a Web site where you can create public and private wiki pages. A Wiki is a Web site where anyone can enter and edit content. That means you can post and edit information about virtually anything you wish, and you can read what others have posted too.
Wetpaint: Wetpaint powers websites that tap the power of collaborative thinking. The heart of the Wetpaint advantage is its ability to allow anyone — especially those without technical skill — to create and contribute to websites written for and by those who share a passion or interest. To do this, Wetpaint combines the best aspects of wikis, blogs, forums and social networks so anyone can click and type on the web.
JotSpot: Create and share wiki pages with a WYSIWYG editor via Jotspot's secure wiki hosting. Install various "applications" to refine your wiki content - project manager, company directory, blog, forum, poll, calendar, and more - then invite others to contribute
PBWiki: Make a free, password protected wiki as easily as a peanut butter sandwich. Easily upload HTML, link files to your pages, integrate RSS, and more.

RSS (Really Simple Syndication): An RSS document (which is also called a "feed", "web feed" or "channel") includes full or summarized text, plus metadata such as publishing dates and author name. RSS format is used to publish frequently updated data such as blog posts, data from news websites.
FeedBurner: FeedBurner helps bloggers, pod casters and commercial publishers get more value from the content they create. Our advanced feed management technology deftly delivers subscription services to the users. Personally I am using feedburner to burn RSS feed of this blog.
Feed Digest: Feed Digest is a parser, regenerator, and syndicator for, and of RSS and Atom feeds. It lets you do things like put the content of RSS or Atom feeds on your own site(s). Some other RSS sites are Attensa, Tiny RSS,Feed43,Feed Mailer.

Mashups: A mashup is a composite web application, where data sourced from one site is then mashed up with the data sourced from other site and then put on a single website/platform. There are many types of mashups, such as consumer mashups, data mashups, and business mashups. The most common type of mashup is the consumer mashup, aimed at the general public. Examples include Google Maps mashups, which combine web-based data sources with interactive cartographic maps. The potential uses of mashups are as wide and varied as the Web. Examples of mashups are CoolFlick, Flickervision, MapmyEvent, and Google Map etc.

The great thing about Web 2.0 websites is that they all have got very user-friendly interface. All you have to follow the guidelines provided in the website and make your own content/website and it’s all free. Is not it feels great?

RELATED ARTICLES
How to submit blogger blog sitemap to google
How to add Favicon icon in your blogger blog
10 Tips to increase traffic to your blogger blog
How to add Tags in a post in blogger template
Tips to speed up Your Computer
Blog Title’s Dilemma
How to embed comment form below Post in blogger template


How to Submit Blogger Blog Sitemap to Google

If you want to get included in Google search Results you have to submit your Blogger Blog/site to google.Here is the step by step procedure:

Step1:Login to your Blogger account and from the dashboard Click Webmaster Tools link.You will be landed into the screen shown below:


Step 2:Click Add a Site Button and You will see the following screen as below:
Type the url of your blogger template site and click Continue Button.

Example:yourblogname.blogspot.com(Do not use www or Http before the url)

Step 3:Now google asks you to verify your site as shown below:
Here you can see that Status as NOT VERIFIED.
Step 4:Now you have to verify your site.Copy the Meta tag displayed by Webmaster as you can see in above picture and paste it at the place shown in the above picture.In case you are not sure where to paste meta tag then From Dashbord Go to Layout>Edit HTML and find the Title Tag and Paste the meta tag just above the Title Tag,save your Changes and see the status of your site in webmaster tools and it will be shown as Verified status OK.
Step 5.Now in webmaster tools Go to Dashboard and Click Sitemaps and you will be landed into following screen as:
Click on the Add a sitemap Button and you will see Following screen:

Type "rss.xml" in the box provided next to your blog/site url and click Submit Sitemap Button.Blogger creates a RSS feed at the time when you create your blog and google accepts RSS and Atom feed as sitemap.

Its done now and google will take some time to tell the status of indexed urls of your Blogger Blog site.
Recent Articles:
What is Web 2.0
How to add Favicon icon in your blogger blog
10 Tips to increase traffic to your blogger blog
How to add Tags in a post in blogger template
Tips to speed up Your Computer
Blog Title’s Dilemma
How to embed comment form below Post in blogger template


How to add a Favicon in blogger Template

From the last couple of days you would have noticed that an image appearing next to address bar in my blogger template website. Now you would want to know that what is this image called and how to add it your blogger blog. This image is called as favicon (Short for Favorites Icon).


In a browser window Favicon is displayed on the Address line and in the Favorites menu. The Favicon allows the webmaster to further promote their site, and to create a more customized appearance within a visitor's browser.


I fall in love with Favicon when i saw some blogs showing thier own favicon icons in my browser window as if they are teasing me to get the one.I make my mind to get the same for my blog gbut i was busy doing some other important modifications in my blogger template.So i postponed the idea for a couple of months,but i could not resist my self from getting a favicon more than a couple of days.Now its here next to my blog address in your browser window and in favourites menu as well as in Bookmarks list.Favicon icon gives your blogger blog an identity so that anyone can identify your blogger template blog by just having a look at the favicon logo.


How get a Favicon?
If you wish to create your own Favicon, you can use a free online Favicon Generater available on the web. Some of the popular free online generater websites are:


DynamicDrive.com(Easy to create Favicon & good user interface)
Html-kit.com(Simple and easy to Create Favicon)
Favicon.co.uk
Favicon.com
Genfavicon.com
Favicongenerator.com
Graphicsguru.com


These tools will allow you to generate a favicon.ico file from any image on your computer.As far I am concerned , I have used DynamicDrive.com because generating the favicon icon here is very simple and quickest. You can use anyone you like. All online Favicon generater creates almost same kind of Favicon files(I mean .ico files).

You can use any image file you like to make your favicon. As far as I am concerned i have created an image of 160x160 pixels in Photoshop.Here i am giving you some idea about how to create an image in Photoshop that could be suitable for generating favicon.I have created new file change the size to 160x160px and put a single "m" in bigger font,change the color as you like.Save the image in JPEG format and use it to create favicon in any online favicon generater discussed above.


Step 1:Press the Browse button and select the file(JPEG,GIF,PNG etc) from yor computer.
Step 2:Press the create Icon Button.
Step3:Preview the favicon and press Download/save to your Computer.
Now you have got the Favicon.ico file all you have to add it to your blog website. There are 2 methods for doing this given below:

First Method:
Personally I have used this method to add Favicon icon in my blogger blog because this method s is very simple.
Step1:Login in to your blogger account From the Dashboard>Layout>posting>Create a new post


Step 2:Press insert picture button and browse and upload the Favicon icon form you computer ,preview it and using the right click on the Favicon icon,copy image location and save this in a text file for further reference .Hide the preview and Save this post as draft.(Do not publish it because we are using this post only to store the image(Favicon icon).


Step 3:From your Dashboard Goto>layout>Edit HTML. Check Expand Widget Templates and download the full template before making any change.
Step 4:Scrool down to where you find this line of text
]]></b:skin>

Step 4:Add these lines of code(in Blue) below above line of code.


<link href=’Paste Your Favicon image url here’ rel='shortcut icon'/>
<link href=’Paste Your Favicon image url here’ rel='icon'/>


Step 5:Save the template and Preview you blog website. If all have gone well the Favicon icon will look like the shown below in picture.

Alternative Method:
You can use any image hosting websites to store your Favicon icon. Some popular ones are:

Imageshack
Tinypic.com
Photobucket.com

Some of these websites requires you to first sign up for free and then provides you the image hosting service. Imageshack and Tinypic.com do not require any sign up or registration. After uploading your Favicon image these websites will display the Favicon image url copy it for the use in your blogger template.
Step 1:From your Dashboard Goto>layout>Edit HTML. Check Expand Widget Templates and download the full template before making any change.
Step 2:Scroll down to where you find this line of text
]]></b:skin>

Step 3:Copy the following 2 lines of code(in blue) just below above line of code.


<link href=’Paste Your Favicon image url here’ rel='shortcut icon'/>
<link href=’Paste Your Favicon image url here’ rel='icon'/>


In my blog I have used following two line of code(After Pasting the Favicon url):


<link href='https://blogger.googleusercontent.com/img/b/R29vZ2xl/AVvXsEj7xdCt4utYKvEPQcyUKX1JkXUVNN3VXV1mQcp3ahi_-2r6UKx4QIGnI-fbWl1CFZuapKhLZmXXnd0WUPIwDH5wjiqQnaw6apNRP__O-rmbKPFFunOazHWXwpyfmonEODSKl3k_i1QxdJs/s320/favicon.ico' rel='shortcut icon'/>
<link href='https://blogger.googleusercontent.com/img/b/R29vZ2xl/AVvXsEj7xdCt4utYKvEPQcyUKX1JkXUVNN3VXV1mQcp3ahi_-2r6UKx4QIGnI-fbWl1CFZuapKhLZmXXnd0WUPIwDH5wjiqQnaw6apNRP__O-rmbKPFFunOazHWXwpyfmonEODSKl3k_i1QxdJs/s320/favicon.ico' rel='icon'/>


Step 4:Save the template and Preview you blog in the browser.Finally it will look like as below:


Recent Articles:
What is Web 2.0
How to submit blogger blog sitemap to google
10 Tips to increase traffic to your blogger blog
How to add Tags in a post in blogger template
Tips to speed up Your Computer
Blog Title’s Dilemma
How to embed comment form below Post in blogger template


How to add Label cloud widget in Blogger Template Blog

"Blogumus" is an Flash based tag cloud widget which uses scripts converted from Roy Tanck's WP Cumulus plugin for Wordpress. I fell in love with Roy's original Cumulus plugin when I saw it, and simply had to learn how to convert this for use in Blogger powered blogs. The result is the widget you can see in action at the top of this post. Hover your mouse over the Flash object to see the animation begin. In this post, I'll explain how you can add Blogumus to your own Blogger layout with ease!


Update: Improved Widget Code I have updated the code required to run this widget to activate links in the tag cloud Flash movie. If you have already installed Blogumus, please replace your widget code with the new updated code, or reference the additional lines to modify your existing installation.

How it works

This widget uses a combination of JavaScript and Flash animation to parse and display your blog labels. Once installed in your template, it should work "out of the box" without any additional tweaking required, though of course you may prefer to change the variables for color, background and size if appropriate :) You should also be able to move the Label Cloud widget through the Page Elements page of your dashboard if you prefer display in a different layout location. To see Blogumus in action, both Flash and Javascript must be installed and enabled for your internet browser. However, it does degrade relatively gracefully, and label links will still be clickable (though not animated) for those who do not use JavaScript of Flash (including search engine spiders).

How to install Blogumus in your Blogger layout

Installing Blogumus in your Blogger layout is surprisingly simple! You should only need to copy and paste a section of code to your Blogger template, though any tweaks for the style of display will require some manual editing. Here are the steps required to install Blogumus in your Blogger layout: Go to Layout>Edit HTML in your Blogger dashboard, and search for the following line (or similar):


<b:section class='sidebar' id='sidebar' preferred='yes'>


Immediatly after this line, paste the following section of code:
  <b:widget id='Label99' locked='false' title='Labels' type='Label'>
<b:includable id='main'>
<b:if cond='data:title'>
<h2><data:title/></h2>
</b:if>
<div class='widget-content'>
<script src='http://halotemplates.s3.amazonaws.com/wp-cumulus-example/swfobject.js' type='text/javascript'/>
<div id='flashcontent'>Blogumulus by <a href='http://www.roytanck.com/'>Roy Tanck</a> and <a href='http://www.bloggerbuster.com'>Amanda Fazani</a></div>
<script type='text/javascript'>
var so = new SWFObject(&quot;http://halotemplates.s3.amazonaws.com/wp-cumulus-example/tagcloud.swf&quot;, &quot;tagcloud&quot;, &quot;240&quot;, &quot;300&quot;, &quot;7&quot;, &quot;#ffffff&quot;);
// uncomment next line to enable transparency
//so.addParam(&quot;wmode&quot;, &quot;transparent&quot;);
so.addVariable(&quot;tcolor&quot;, &quot;0x333333&quot;);
so.addVariable(&quot;mode&quot;, &quot;tags&quot;);
so.addVariable(&quot;distr&quot;, &quot;true&quot;);
so.addVariable(&quot;tspeed&quot;, &quot;100&quot;);
so.addVariable(&quot;tagcloud&quot;, &quot;<tags><b:loop values='data:labels' var='label'><a expr:href='data:label.url' style='12'><data:label.name/></a></b:loop></tags>&quot;);
so.addParam(&quot;allowScriptAccess&quot;, &quot;always&quot;);
so.write(&quot;flashcontent&quot;);
</script>
<b:include name='quickedit'/>
</div>
</b:includable>
</b:widget>

Then preview your template. If installed correctly, you should see the tag cloud appear in your sidebar. Then you are free to save your template, edit the colors and dimensions as required, or move it to a different location. That's all!

Customizing Blogumus

In this default installation, Blogumus includes the following preset variables:

  • Width is set to 240px
  • Height is set to 300px;
  • Background color is white
  • Test color is grey
  • Font size is "12"
If you would prefer to make your widget wider, shorter, change the color scheme, etc, you will need to do this by editing various parts of the code. I'll go through these options in the order they appear in the widget code. Editing width and height The variables for width and height are found in this line of the script:


var so = new SWFObject("http://halotemplates.s3.amazonaws.com/wp-cumulus-example/tagcloud.swf", "tagcloud", "240", "300", "7", "#ffffff");


The width (currently 240) is highlighted in red, while the height (300px default) is highlighted in blue. These numerical values specify the width and height in pixels, so you can alter these of you prefer. Editing background color You can change the background color from white to any other color by altering the hex value in the same line:


var so = new SWFObject("http://halotemplates.s3.amazonaws.com/wp-cumulus-example/tagcloud.swf", "tagcloud", "240", "300", "7", "#ffffff");


For example, if you prefer a bright red background, you may replace #ffffff with #ff0000. Take a look at this page for a list of commonly used hex color codes. Alter the color of text By default, the text is set to display as dark grey ( hex value #333333). You can alter this variable in the following line:


so.addVariable("tcolor", "0x333333");


Be aware that "tcolor" is a Flash variable and doesn't include the usual hash symbol of hex color codes. Be sure to only replace the numbers! Adjust the font size The maximum font size of tags is specified in this line:


so.addVariable("tagcloud", "<tags><b:loop values='data:labels' var='label'><a expr:href='data:label.url' style='12'><data:label.name/></a></b:loop></tags>");


You can alter this to ensure tags are displayed in a bigger or smaller font if you prefer by changing "12" to a larger or smaller number. While making any of these changes, you should be able to preview your widget and be certain that your new choice of color, dimensions and background are suitable for your needs.
Credits, support and requirements
Blogumus is based on the original WP Cumulus plugin by Roy Tanck, and was converted for use with Blogger layouts by myself. Please leave the credit links in the widget code intact. These will not be seen by the majority of your blog readers (as they will only display if JavaScript and Flash is not activated) but leaving these links intact is a great way of passing some link love on to Roy for all his hard work, and to inform other Blogger users that they can find the widget codes on this site.
Support/Issues
If you have any problems installing or using this widget, please leave your comments below or direct these to the Blogger Buster forums as Roy will be unable to provide support for installation in Blogger blogs!
Requirements
For Blogumus to display properly in your template, you will need to have Flash Player 7 or higher. You can download the latest Flash Player plugin for your browser from Adobe. I'm not sure that this installation will support special characters as tags (only Latin characters supported at present). If you do experiecce issues with labels displaying incorrectly, please let me know. I'll try to add more support, but have very little experience using Flash!
Your thoughts?
I hope that you enjoy using Blogumus in your own Blogger blogs! Please feel free to share or syndicate this page with your favorite bookmarking service if you think it is worth a mention, or subscribe to the newsfeed to learn of more great Blogger tutorials as they are posted.
Sincere Thanx to Blogger Buster

Related Articles:
How to add lebels to your post


Recent Articles:
What is Web 2.0
How to submit blogger blog sitemap to google
How to add Favicon icon in your blogger blog
10 Tips to increase traffic to your blogger blog
How to add Tags in a post in blogger template
Tips to speed up Your Computer
Blog Title’s Dilemma
How to embed comment form below Post in blogger template

Increase traffic to your blog with Feedburner

While working on my blog, I came across a webmaster tool called feedburner and Ibelieve me the tool can do wonders to your sitefeed.So firstly, I should explain you what is a Feedburner? The Feedburner is a website/web tool used by bloggers to customize their blog layout and analyze traffic coming to their blog's RSS/Atom feed.
Recently it has been acquired by Google Inc. Great news for google fans! It provides the bloggers an easy to use interface to analyze and customize their blog feeds. The tool is very important for non technical bloggers. (Those who have very little or no knowledge of XML/Blogger) Burning your feeds with feedburner does not require you to register your blog feed with google index. The USP of the tool/product is its easy to use interface and no prior knowledge of XML/HTML.It can be used with different Blogger template. As a Blogger I would suggest you to use this tool because the tool can do wonders to your blog's feed(Thus blog) like drastic increase in Page Impressions and Adsense revenue

Here is the step by step procedure to burn your blog feed with Feedburner:

Step 1:Type feedburner.google.com in your browser window. Or Go to Feedburner link from Dashboard.
Step 2:You can Sign In to the Feedburner with your google account. If you don’t have a google account first Sign Up for a feedburner account.

Step 3:Type the blog address and you are ready to use the feedburner features.
Step 4:Now Select your RSS/Atom feed.Click on RSS feed address because RSS is good for dynamic content as shown below in picture.


Here I am describing some of the features I like:

Headline Animator: After activating this feature, there has been a drastic increase in page impressions(from 0 to 1000 per month) of my blog. Do you know how much page impressions I was getting earlier. It was virtually 0.Now you must be curios to know about what a headline animator is? A headline animator is a graphics window that has been especially designed to promote your blog ’s content The feature allows you to create more than 1 headline animators. So use them wisely to promote your blog ’s content. The feature is good for increasing readers and Page impressions.

Feed count: Activating this feature lets you to count the number of readers of the blog who subscribe to your posts via E-mail/RSS feeds. It gives you the choice of directly adding this widget to your Blogger template or pasting HTML code in Blogger template.

Subscribe Via Email: Activating this feature lets the bloggers to offer subscription via E-Mail. I suggest you to use this feature.

Analyze Traffic: You can analyze traffic to your blog with the help of different Graphical reports.

Adsense: You can display adsense ads and also manage your ads from feedburner.

The above list is only few of the features of feedburner tool. You can explore a number of other features of this tool. All the features of this tool are almost self-explanatory.

I hope you will be able to burn your blog feed with feedburner. And in case face any problem s comments welcome.
Recent Articles:
What is Web 2.0
How to submit blogger blog sitemap to google
How to add Favicon icon in your blogger blog
How to add Tags in a post in blogger template
Tips to speed up Your Computer
Blog Title’s Dilemma
How to embed comment form below Post in blogger template


How to select a good title for your blog

Choosing a title for your blog is no rocket science but I tell you that it could turn out to be more complex than that. I have been blogging on Computers, technology, Software , Blogger Template,Blogging,How to blog, Web 2.0 so I wanted to have a title that could justify and be relevant to the subject of my blog. Therefore I ordered my brain to think of a title, in fact the best title. The very first title that came to my brain was Digital Lines and few others were Digital Labs, Explore IT, Digital Living, Digital Works, And Digital Webzine. I like Digital Lines and Digital Living both but there were blogs with the word digital and i don't wanted to look my blog title copied form somewhere. Now I will tell you why I chose the title Make My Blog for my blog.

Here is why:
1.What I think that for a blog the title should justify the content of your blog. The title of a blog should be descriptive enough to tell you about the content of the blog. The title Make My Blog is descriptive and relevant the content of my blog.

2.As I would be writing about How to Blog,Blogging template,Computers, Technology, Blogging, Software, Web 2.0 therefore the title Make My Blog truly justify the content. My aim is to create an aptitude for the web 2.0 Websites rather giving a how to guide or tech tips.

3.I was looking a title that is descriptive,small, easy and relevant to my blog content and I think Make My Blog is perfectly did that. Having a small title does keep your domain name shorter so that readers have to type less text in browser window. But when I was creating my blog the blog domain with this title was not available and I had chose another name (techieway) in my domain address leading my blog domain a bit longer i.e. www.techcenterplace.blogspot.com. I will have my own domain (i.e. Make My Blog) in future, I hope so.

4.And most of all I chose the title Make My Blog because I like it. I tell you that no reasons can justify a liking. In fact liking is beyond any reasons and therefore I strongly suggest you to follow your heart in case you are a bit confused about selecting a title.
Recent Articles:
What is Web 2.0
How to submit blogger blog sitemap to google
How to add Favicon icon in your blogger blog
10 Tips to increase traffic to your blogger blog
How to add Tags in a post in blogger template
Tips to speed up Your Computer
How to embed comment form below Post in blogger template


How to Add a Label to your Post in Blogger Template Blog

Labeling a post is very useful feature for Bloggers as it helps in indexing your blog post by search engines like Google and Bing. A label is a keyword (or a group of keywords) attached to a post so that It will be easier for search engines like Google to categorize your blog / post.


How to add label to a blog post:

Step 1: Go to the Template > Page Elements tab, or just click the Layout link on your Dashboard.

Step 2: Click the Edit link on the “Blog Posts” widget.

1. In the configuration window, you’ll see an option to display the labels with each post. You can change the text used for this if you like, but the most important part is to have this option checked.

2. Save your changes, and view your blog to see your labels.

In case the labels attached to your post are not displayed , either switch to a default Blogger template (i.e. Minima White) or consult the template designer.

Can I revert to my default template options? Yes, Follow the procedure below:

Step 1: Go to the Template > Edit HTML tab.

Step 2: Click the Revert widget templates to default link.

Step 3: Click OK in the confirmation message.

Step 4: Go back to the Template >Page Elements tab and check the settings again, as above.

While writing a new post you should attach labels to your post otherwise they will not be displayed even after making above changes. At the bottom of Post edit window there is a option Labels that lets you assign labels to your post.

.

m