Trick to Post Empty Status or Comment on Facebook


We earlier posted a
Trick to Fake Status Update on Facebook.
Now We have come up with a new Trick i.e to Post Empty Status or Comment on Facebook.

Yes this is the Trick as it is not possible to Post an Empty Status or Comment on Facebook. Sonow it everything is possible by
TOP TRICKS AND TIPS.


So to use this Trick just follow these simple steps :


1) Login to your Facebook Account.

2) Now go to Status Update or the Comment field.

3) Now just Press and keep holding Alt key and type 0173 .

4) Now release the Alt Key and Click on Post to Share your Empty Status.

5) Now it is done. Your Empty Status or Comment has been Posted on Facebook.


So it is a simple Trick to Post Empty Status or Comment on Facebook.

Trick to Post Empty Status or Comment on Facebook


We earlier posted a
Trick to Fake Status Update on Facebook.
Now We have come up with a new Trick i.e to Post Empty Status or Comment on Facebook.

Yes this is the Trick as it is not possible to Post an Empty Status or Comment on Facebook. Sonow it everything is possible by
TOP TRICKS AND TIPS.


So to use this Trick just follow these simple steps :


1) Login to your Facebook Account.

2) Now go to Status Update or the Comment field.

3) Now just Press and keep holding Alt key and type 0173 .

4) Now release the Alt Key and Click on Post to Share your Empty Status.

5) Now it is done. Your Empty Status or Comment has been Posted on Facebook.


So it is a simple Trick to Post Empty Status or Comment on Facebook.


Trick to Create Multiple Email Addresses in Gmail


Gmail is one of the most use Email Service all over the Globe.
Almost everyone on the Web would be having atleast one Gmail Account and most of us have more than one.
But sometimes we find it very boring while we use number of Email Accounts and have to Login and Logout simultaneously from these Accounts.


So for this it would be nice to have One Master Email Account from where we can send Emails from Multiple Email Addresses We have.


Now there is Option in Gmail to integrate Multiple Email Accounts into a single Gmail Account. Through this Option we can send Emails from our Single Email Account with any of our Email Address that has been registered.
So to use this Trick just follow these simple Steps :


1) Log in to your Gmail Account and Click on Settings at the Top Right Corner.


2) Now Click on Accounts Tab and Click on Add Another Email Address You Own.


3) Now a Verification Email would be sent to the Address specified and once Verified that you Own the Email Address, it will be Integrated to your Gmail Account.


4) Now it is done. Now you can Send Email from Multiple Email Addresses by single Account.

So it is a simple Trick to Create Multiple Email Addresses in Gmail.

Trick to Create Multiple Email Addresses in Gmail


Gmail is one of the most use Email Service all over the Globe.
Almost everyone on the Web would be having atleast one Gmail Account and most of us have more than one.
But sometimes we find it very boring while we use number of Email Accounts and have to Login and Logout simultaneously from these Accounts.


So for this it would be nice to have One Master Email Account from where we can send Emails from Multiple Email Addresses We have.


Now there is Option in Gmail to integrate Multiple Email Accounts into a single Gmail Account. Through this Option we can send Emails from our Single Email Account with any of our Email Address that has been registered.
So to use this Trick just follow these simple Steps :


1) Log in to your Gmail Account and Click on Settings at the Top Right Corner.


2) Now Click on Accounts Tab and Click on Add Another Email Address You Own.


3) Now a Verification Email would be sent to the Address specified and once Verified that you Own the Email Address, it will be Integrated to your Gmail Account.


4) Now it is done. Now you can Send Email from Multiple Email Addresses by single Account.

So it is a simple Trick to Create Multiple Email Addresses in Gmail.


Top 5 Tips to Deal with Laptop Over Heating


A Laptop is an Expensive Device which requires a Great care for better running. This practice is followed by almost all Laptop users but but 90% of them face the problem of Laptop Over Heating.
This Overheating is dangerous for Laptop and it can cause the Laptop to show Abnormal behaviour finally causing its Internal Machinery to Fail.


So keeping in mind the effects of Over Heating here are Top 5 Tips to Deal with it.

1) Clean Circulating and Cooloing Vent Regularly. The Circulating and Cooling Vents are the area of Laptop from where the outer air is used to keep the Laptop cool. But while working under Dusty conditions, there are chances that the dust gets deposited on it and thereby Choking them altogether. This cause the over working of fan in High Temperature and finally resulting in Over Heating of Laptop. So we should try to use Laptop in Dust Free Conditions and if not possible then you can use a CAN of Compressed air. This CAN is easily available at Computer Store. So just use the CAN to spray near by the Cooling Vent of Laptop to Clean the Choking area. 


2) Use Power Saver Mode. Most of the times when we work on the Laptop while Charging, We set the mode of use as High Performance thinking that it will work better and can fulfill it demand by the Charging applied. But this is the wrong practice. As this Setting will consume the most of the Power and will cause Laptop Over Heating. So for this we should simply Set the Laptop in the Balanced or Power Saver Mode. Probably we should use the High Performance setting at the time when we are running the Big Applications or Games.


3) Keep Surface Smooth. Laptop seems tobe very Handy and we often work on it while we are Lying in Bed or somewhere other where the Surface on which Laptop is kept may not be Smooth. But this is the most wrong practice. As whenever we work on Laptop with surfaces which are not such smooth and its Vents are not getting the sufficient air supply, then the Over Heating of Laptop would be definetely taking place. So We should try to keep the Laptop on the surface where it gets the sufficient air and its Vents are not blocked by any obstacle.


4) Use Cooling Pad. You can also buy Cooling Pad for your Laptop if you are very conerned about your Laptop. This is alsoeasily available at Computer Store.


5) Switch It OFF. This Tip can prove to be working for many Laptop Users. As whenver there is no need of the Laptop then Turning OFF can be the best Option. If you feel like not Turning it OFF, then you can use the Hibernate Option which willnot only Save your Work and Battery but would also Prevent Laptop from Over Heating.


So these are Top 5 Tips to Deal with Laptop Over Heating.

Top 5 Tips to Deal with Laptop Over Heating


A Laptop is an Expensive Device which requires a Great care for better running. This practice is followed by almost all Laptop users but but 90% of them face the problem of Laptop Over Heating.
This Overheating is dangerous for Laptop and it can cause the Laptop to show Abnormal behaviour finally causing its Internal Machinery to Fail.


So keeping in mind the effects of Over Heating here are Top 5 Tips to Deal with it.

1) Clean Circulating and Cooloing Vent Regularly. The Circulating and Cooling Vents are the area of Laptop from where the outer air is used to keep the Laptop cool. But while working under Dusty conditions, there are chances that the dust gets deposited on it and thereby Choking them altogether. This cause the over working of fan in High Temperature and finally resulting in Over Heating of Laptop. So we should try to use Laptop in Dust Free Conditions and if not possible then you can use a CAN of Compressed air. This CAN is easily available at Computer Store. So just use the CAN to spray near by the Cooling Vent of Laptop to Clean the Choking area. 


2) Use Power Saver Mode. Most of the times when we work on the Laptop while Charging, We set the mode of use as High Performance thinking that it will work better and can fulfill it demand by the Charging applied. But this is the wrong practice. As this Setting will consume the most of the Power and will cause Laptop Over Heating. So for this we should simply Set the Laptop in the Balanced or Power Saver Mode. Probably we should use the High Performance setting at the time when we are running the Big Applications or Games.


3) Keep Surface Smooth. Laptop seems tobe very Handy and we often work on it while we are Lying in Bed or somewhere other where the Surface on which Laptop is kept may not be Smooth. But this is the most wrong practice. As whenever we work on Laptop with surfaces which are not such smooth and its Vents are not getting the sufficient air supply, then the Over Heating of Laptop would be definetely taking place. So We should try to keep the Laptop on the surface where it gets the sufficient air and its Vents are not blocked by any obstacle.


4) Use Cooling Pad. You can also buy Cooling Pad for your Laptop if you are very conerned about your Laptop. This is alsoeasily available at Computer Store.


5) Switch It OFF. This Tip can prove to be working for many Laptop Users. As whenver there is no need of the Laptop then Turning OFF can be the best Option. If you feel like not Turning it OFF, then you can use the Hibernate Option which willnot only Save your Work and Battery but would also Prevent Laptop from Over Heating.


So these are Top 5 Tips to Deal with Laptop Over Heating.


How to Fix Task Manager Disabled by Administrator in Windows


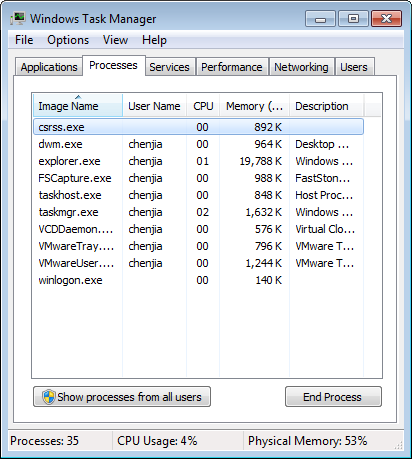
Task Manager is most used Application and we probably use it when we want to End any Unstable Application, Check Running Processes, Monitor CPU Performance, etc.
But many a times it may happen that our Computer might be Infected by some kind of Virus and the Task Manager is not running.


This can be even showing an error message like "Task Manager Disabled by Administrator".
So for this error, here is Trick on How to Fix Task Manager Disabled by Administrator in Windows.

Registry Trick

1) Click Start  >>  Run  >>  type "regedit" ( without quotes )  >>  press Enter to Open Registry Editor.

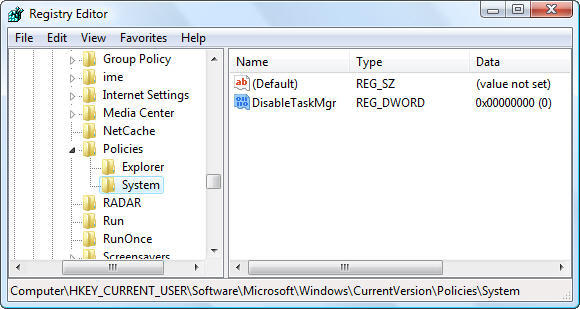
2) Now navigate to HKEY_CURRENT_USER\Software\Microsoft\Windows\ CurrentVersion\Policies\System.

3) Here look for Registry Key named like "DisableTaskMgr" in the Right Pane. If you find this just simply Delete the key or Set its value to 0 by Double Clicking on it.


Group Policy Trick
If you not find any Registry Key named like "DisableTaskMgr" then alternatively use this Trick.

1) Click Start  >>  Run  >>  type gpedit.msc  >>  press Enter to open Group Policy.

2) Now Navigate to User Configuration  >>  Administrative Templates  >>  System  >>  Ctrl+Alt+Delete Option  >>  Remove Task Manager.

3) Now Right Click it  >>  Edit  >>  Select Not Configured  >>   Apply  >>  OK and Exit.


4) Now Restart the Computer and the Error must be Fixed.


Other Tricks
If the Task Manager is still not Fixed Yet then try these Tricks.


1) As Malware or other kinds of Virus may prevent Task Manager from Opening so try a Deep Malware and Virus Scan.This may help you. For this you can use the Product by Microsoft i.e. Microsoft Security Essential.

2) Run System File Checker by typing sfc/scannow in Command Prompt and pressing Enter.

If still now the Problem is not Fixed then We recommend that you ReInstall Windows. As this Problem can cause further Errors and Damages to your Computer. Or For more help you can Contact Us.

So these are simple Tricks on How to Fix Task Manager Disabled by Administrator in Windows.

.

m